Sunday 23 February 2014

Farinata


Also known as socca, farinata is a simple Italian flatbread type of pancake made of chickpea flour. I've made it before with Ottolenghi's recipe, but wanted to try Ruby Tandoh's recipe with rosemary and garlic, which actually tasted better if you ask me. It's quick and easy to make, and nice with a salad or something on the side.


Makes 8-10 large pancakes

8 tbsp olive oil, plus more for greasing
2 garlic cloves, crushed
3 sprigs rosemary
300g chickpea flour (gram flour)
1 tsp salt
Black pepper, to taste
500ml water

1. In a small saucepan over a medium-low heat, cook the olive oil, garlic and the leaves from two rosemary sprigs until the garlic is sizzling. Take the pan off the heat and leave to cool. If it sits around for a while, even better – the flavour from the rosemary and garlic will have longer to infuse.


2. Combine the chickpea flour, salt and pepper in a large bowl. Strain in the infused oil through a sieve (discarding the rosemary leaves and garlic), and add a little of the water. Stir to combine, then add the remaining water gradually until the mixture slackens to the consistency of a thick batter.

3. Heat some olive oil in a frying pan until hot. Spoon in enough of the batter to coat the bottom of the pan. While the upper surface of the bread is still wet, sprinkle on a few rosemary leaves from the remaining sprig. Once the upper surface has set (this won't take more than a minute or two) flip the pancake and cook for a further couple of minutes, or until golden brown in patches.
4. Repeat until all the remaining batter has been used, making sure that the pan is well‑oiled each time.


Monday 27 January 2014

Peanut butter cups

I combined a couple of peanut butter cup recipes to come up with this version of peanut butter cups that is vegan, and wheat and sugar free. And addictive...


Ingredients

3/4 cup crunchy peanut butter
1/4 cup maple syrup
1 cup coconut shreds
1/8 cup melted coconut oil
100g dark or raw chocolate
+ crushed almonds/peanuts/walnuts to decorate


1. Mix together everything but the chocolate in a bowl. If it's too dry, add a little more coconut oil, a bit at a time. Spoon and press into lined cupcake tins.

2. Melt the chocolate. Spread evenly over the top of the peanut butter mix. Sprinkle some crushed nuts on top to decorate.

3. Pop them into the fridge for at least 2 hours until set.

Sunday 12 January 2014

Puréed beetroot with yogurt & za'atar


This recipe is from Ottolenghi's Jerusalem book. The chilli, garlic, syrup and za'atar combine sweet and spiceness together wonderfully. I wanted to make a vegan version, but I was afraid using plain soy yogurt instead of Greek yogurt would make the purée too runny. Now that I know what it's supposed to taste like I'll have to experiment and see if 1/2 portion soy yogurt and 1/2 portion mashed potatoes would do the trick. Of course I can always try making my own vegan yogurt too...

Serves 6

Ingredients:

900g medium beetroots (500g after cooking and peeling)
2 garlic cloves, crushed
1 small red chilli, deseeded and finely chopped
250g Greek yogurt
1 1/2 tbsp date or maple syrup
3 tbsp olive oil + extra to garnish
1 tbsp za'atar

To garnish:

2 spring onions
15g toasted hazelnuts, roughly crushed

Preheat oven to 200C/180C Fan/Gask Mark 6.

Wash the beetroot and place it in a roasting tin. Put them in the oven and cook, uncovered, until a knife slices easily into the centre, approximately 1 hour. Once they are cool enough to handle, peel and cut each one into about 6 pieces. Allow to cool down. Place the beetroot, garlic, chilli, and yogurt in a food processor bowl and blend to a smooth paste. Transfer to a large mixing bowl and stir in the syrup, olive oil, za'atar and 1 teaspoon of salt. Taste and add more salt if you like.

Transfer the mash onto a serving plate and use the back of a spoon to spread the mixture around the plate. Scatter the spring onion and hazelnut on top and drizzle some more olive oil on top. Serve at room temperature.


Tuesday 17 December 2013

Chocolate Fudge Cake with Rich Coconut Cream Ganache

I celebrated my birthday last week by making and eating this super rich vegan chocolate fudge cake. Very easy and possibly the best ganache in memory. Thank you to my friend Sid for passing on the recipe (link here but also copy-pasted below).


(From thekindcook.com)
INGREDIENTS (FOR THE CAKE)
1 cup of plain flour
¼ cup of cocoa
1 cup of sugar
1 teaspoon of baking soda
1 teaspoon of baking powder
½ teaspoon of salt
1/3 cup of oil (I used rice bran oil)
1 cup of rice milk

INSTRUCTIONS (FOR THE CAKE)
Preheat your oven to 180%.
Carefully line a cake tin with baking paper. This is a really important step because it always sticks as it is such a wet fudgy consistency.
Sift all the dry ingredients in a large bowl and stir to combine. Whisk all the wet ingredients together. Put the dry ingredients into the wet and gently fold them through until well combined.
Pop in the oven and bake for about 30 minutes. The time will vary depending on your oven. You are looking for a cake where the top is not wobbly, the sides have come away from the edge of the cake tin and a bamboo skewer comes out clean. Once cooked, remove and allow to cool.

INGREDIENTS (FOR THE ICING)
2/3 cups of coconut cream
120 grams of icing sugar
½ cup of cocoa
150 grams of Lindt dark chocolate. Must be at least 70% cocoa

INSTRUCTIONS (FOR THE ICING)
Make your icing once your cake is almost cooled, out of its tin and on a serving plate.
Sift the dry ingredients into a bowl.
Melt the chocolate. While the chocolate is melting put the coconut cream into a small pot and gently heat. You don’t want to boil it. You just want to bring it up to a nice warm temperature. Once the chocolate is melted quickly whisk it into the warm coconut cream until well combined.
Add the dry ingredients into the chocolate mixture and whisk until well combined and scrape out onto the cake. Distribute evenly. There is PLENTY so it will be lovely and thick.
Top with your favourite berries and serve.

Servings:  Enough for 8 good slices
Time: Takes about an hour plus allow cooling time.
Freeze: N/A
Notes:  I find this much easier to slice if you make and ice it the day before and refrigerate it over night. Just make sure you pull it out a couple of hours before you serve it so the ganache is nice and soft.
Topping with berries is really recommended because this is such a rich, sweet cake so the bitterness from the berries provides a lovely balance.

Thursday 17 January 2013

Melbourne restaurants

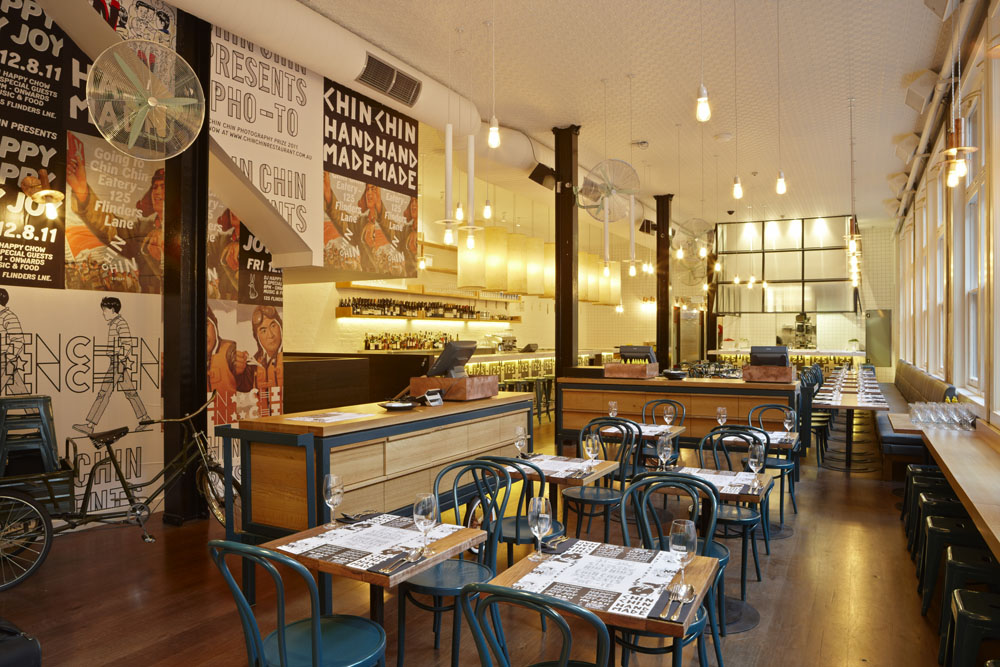
Chin Chin 125 Flinders Lane (South-East Asian)

Last month I  completed my first visit to Australia. Even though it's taken me long enough to write about it, I still feel compelled to so -- Melbourne was a wonderful place and experience. The trip was work-related, but my friend I managed to steal away enough time to explore the city in good time, and every evening we made a point of eating well.

Mamasita 11 Collins Street (Mexican)
We didn't have to go far to find good ones. Excellent ones, in fact. There wasn't a single evening that we left a restaurant unsatisfied. Each one served fantastic, creative, down-to-earth food that respected the natural flavours of good-quality raw ingredients. Though choice was sometimes a little limited, all the vegetarian options that I enjoyed were impressive and didn't leave me wanting In fact, given the variety at some places, it was almost a relief to be a vegetarian since it cuts down the amount of choice... I also noticed that a few places make a point of offering gluten free dishes (like Chin Chin and Sonido), which was rare elsewhere.

Meatball & Wine Bar 135 Flinders Lane (Italian Artisan Meatball Restaurant)

I also learned that Melbourners eat out early. Restaurants (at least in the CDB) are packed from 5:30 onwards. Most of the places don't take reservations and work on a first-come-first-serve basis. Most places also felt quite noisy - you often had to shout. For some reason my companion and I were dismayed at the poor quality of the Australian red wine served in many places (Cumulus Inc, Movida and Meatball were notable exceptions) - best keep to white to be safe unless certain. I was also surprised that Australian prices are a bit higher than Finland. Still, the food was so fantastic that it was worth the culinary experience. This feeling is merely heightened by the buzzing and abundant café culture that sweeps right through the entire city, but that's another story. In sum, rest assured, Melbourne is up there with the great cities of the world and in my book easily competes with the likes of New York when it come to eating out.

Sonido 69 Gertrude Street (South American café-restaurant-bar)

See also these fab spots:

Culumus Inc - 45 Flinders Lane
(Mixed cuisine with French emphasis)

Movida - 1 Hosier Lane
Tapas restaurant


NB: I do not take credit for any of the photos posted here. All credits belongs to the authors of the pages the link leads to.

Tuesday 25 December 2012

Chocolate truffles

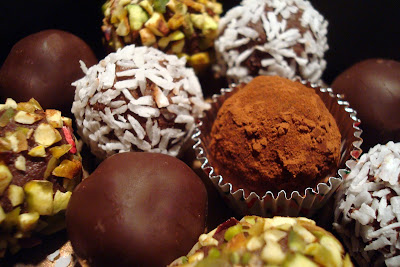
This Christmas I did not buy presents; I made them.  I've made rum raisin chocolates before, which I like to make for colleagues and friends now and then, but they weren't quite festive enough on their own for presents, so I decided to try making a (small) variety of other chocolates to accompany them. I opted for chocolate truffles rolled in pistachios and coconut flakes, and rum flavoured truffles rolled in cocoa powder. Finally, I also made chilli chocolate truffles coated in chocolate. All five varieties (including the rum raisin chocolates) took three evenings to make, since the chocolate needs to be melted, mixed, chilled to set, rolled into balls, coated, chilled.


Cocoa-coated, coconut-coated, pistachio-coated, and chocolate-coated chilli chocolates

Rummy chocolate truffles rolled in coconut

A selection

Chocolate truffles coated in pistachio

Chocolates in their box

All of them were easy to make, but took time to roll into balls and coat neatly and evenly. I also found the chilli chocolate recipe a little tricky: at first I chilled the chocolate too long and it set too hard to roll into balls. The recipe calls for less butter and cream, hence is harder stuff, so you need to keep on eye on it if chilling. Also, in my opinion the truffles call for at least 3-4 times more chilli powder than the recipe prescribes (i.e.1-2 tsp). I also need to figure out a better way of doing the chocolate coating. My solution was slightly hilarious: after spooning the melted chocolate over truffle on a cocktail stick and shaking off the extra chocolate, I left it to set by sticking it into a banana! It worked well in the sense that none of them were disproportionately coated, but the downside is that they all have a little hole at the bottom... Oh well. They look pretty and taste lovely, so yay!

Tuesday 6 November 2012

Dark chocolate tartlets

When I made the lemon meringue tarlets, I made enough tart cases to accomodate these dark chocolate tartlets, also form the Ottolenghi cookbook. With the cases ready and waiting, these were very quick to prepare. Making the chocolate filling took under 10 minutes. The recipe is below (see the lemon meringue tart post for the pastry) and produces a rich, creamy and gooey chocolate filling. I had some leftover even, and used it to dip apple slices.. mmm. You can see my shamefully uneven pastry in the photo of the filling - I really need to get a round mould for cutting pastry.


Before...
... and after. Firm, but with a slight ooze. Lovely.


Dark chocolate filling

150g dark chocolate, broken up
100g unsalted butter, diced
1 egg
1 egg yolk
30g caster sugar
6 pre-baked tartlet cases (baked 5 min less than suggested and left in their tins)
cocoa powder for dusting

1. Preheat the oven to 170C. Put the chocolate and butter in a bowl, set it over a pan of summerng water and leave to melt. Whist the egg and yolk with the sugar until thick and pale yellow, then fold this into the melted chocolate.

2. Fill each case with the chocolate mix; it should reach right up to the rim. Place in the oven and bake for 5 minutes. Cool a little, then remove the tartlets from their tins and allow them to cool down completely.

3. Lightly dust with cocoa powder and serve at room temperature.